Change PHP version on Apache

You can install multiple PHP versions on your system and switch PHP version between them.

Example:

The PHP 5.6 is set as default version in your system, and you need to switch to PHP 7.2. Run the following commands to switch for Apache and command line.

sudo a2dismod php5.6
sudo a2enmod php7.2
sudo service apache2 restart

sudo update-alternatives --set php /usr/bin/php7.2
sudo update-alternatives --set phar /usr/bin/phar7.2
sudo update-alternatives --set phar.phar /usr/bin/phar.phar7.2
sudo update-alternatives --set phpize /usr/bin/phpize7.2
sudo update-alternatives --set php-config /usr/bin/php-config7.2

PHP 7 on Ubuntu 14

sudo apt-get install software-properties-common

sudo apt-get -y update
sudo add-apt-repository ppa:ondrej/php
sudo apt-get -y update
sudo apt-get install -y php7.0 libapache2-mod-php7.0 php7.0 php7.0-common php7.0-gd php7.0-mysql php7.0-mcrypt php7.0-curl php7.0-intl php7.0-xsl php7.0-mbstring php7.0-zip php7.0-bcmath php7.0-iconv
sudo a2enmod php7.0 (sudo a2dismod php5 if needed)
sudo service apache2 restart

Linux commands

Database dump: mysqldump -uUSERNAME -pPASSWORD DATABASE > backup.sql

Database import: mysql -uUSERNAME -pPASSWORD DATABASE < backup.sql

Change language :  nano /etc/default/locale

Check server version: lsb_release -a

Check php version: php -v

Git new branch: git checkout -b master origin/master

Magento sales emails cron job setup

Troubles with magento sales emails?

If you are having troubles with Magento sales emails not being sent to your customers, you just need to set/check up on CRON job on your server to see if it is working properly.Starting with Magento 1.9.1 the emails are not being sent directly during checkout but instead are being queued. The queue is being processed via your Magento cronjob.

In this article I will describe how to setup cron jobs in CPanel and via SSH. Setup is very similiar and if you have any other access it would be very likely to this two.

Setup cron job via SSH

Before setting up a new cronjob, please make sure the Magento cronjob (a cron running cron.php) hasn’t been set up yet. Use the following command to get the currently installed cronjobs:

crontab -l

If the cronjob hasn’t been set up yet, you will need to open the crontab file to set up the cronjob. The crontab manages which and when cronjobs are run on the server.

crontab -e

Enter the following line and replace PATH_TO_MAGENTO_INST with real path to directory of your Magento installation and PATH_TO_PHP with path to your php installation:
*/5 * * * * PATH_TO_PHP -f /PATH_TO_MAGENTO_INST/cron.php &> /dev/null

You can find PHP installation path with command <code>which php</code>.

Save file and you will get message crontab: installing new crontab. And then check once again with crontab -l.


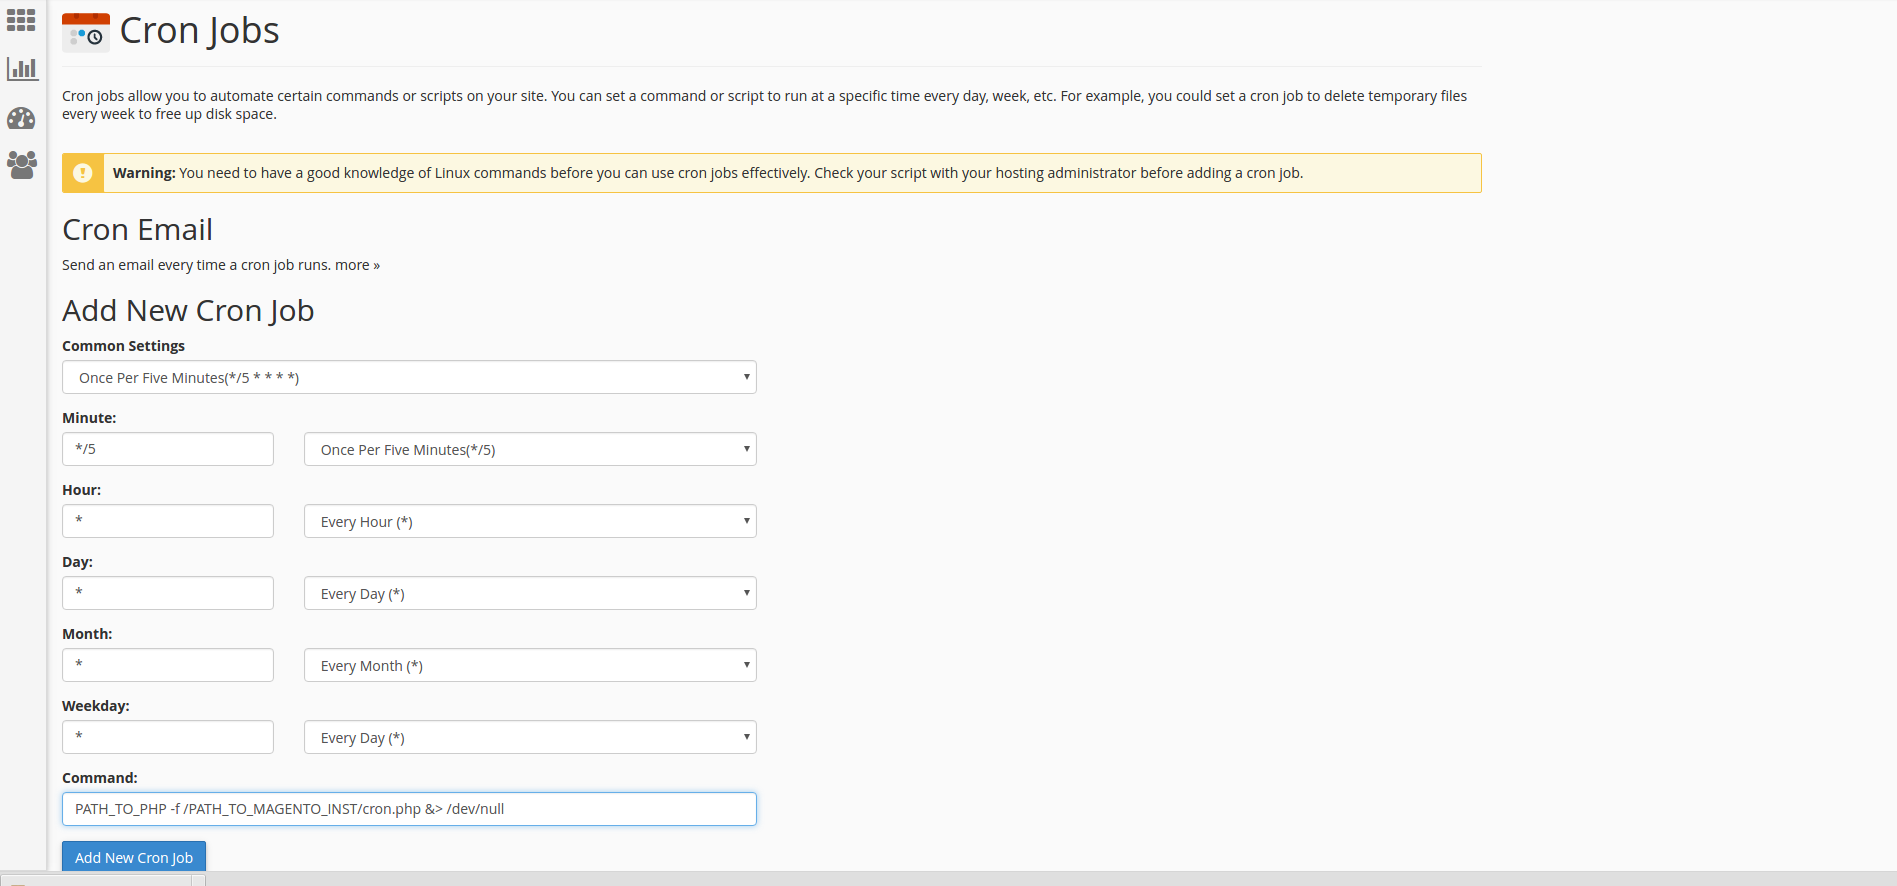
Setup cron job via CPanel

Find Cron Jobs settings in your panel (Advanced -> Cron jobs) and first check that it has not been set up yet. Now add new cronjob with following parameters and click on button to finish

magento sales email cronjob setup in cpanel


Now when you setup cron job either cpanel or SSH way, you just have to wait for emails 🙂

If you have installed cronjob, but still have problems with cron or not sure if cron is running, try to install a free extension AOE Scheduler. This extension can show you the status of cron and cron tasks including a timeline view. And dont forget that Magento recommends running cron every minute for EE and every five minutes for CE.

LAMP Install on Ubuntu – how to

Before we start with LAMP install, many will ask “What is LAMP?”.

LAMP is short for Linux, Apache, MySQL and PHP, an open-source Web development platform, also called a Web stack, that uses Linux as the operating system, Apache as the Web server, MySQL as theRDBMS and PHP as the object-oriented scripting language. Perl orPython is often substituted for PHP. And now when we answered that important question we can start with

LAMP Install – Ubuntu

  1. LINUX
  2. Since we already running Ubuntu, the linux part is taken care of.
    Before starting the installation, make sure your distribution is up to date so open terminal and run command:
    sudo apt-get update
    sudo apt-get upgrade

    whichdownloads the package lists from the repositories and “updates” them to get information on the newest versions of packages and their dependencies. It will do this for all repositories and PPAs.

  3. APACHE
  4. The Apache HTTP Server has been the most popular web server on the public Internet.
    To install apache, open terminal and type in this command:

    sudo apt-get install apache2

    To check if Apache is installed,Open a web browser and navigate to http://localhost/. You should see a message saying It works! or Apache2 Default page like in picture below

    apache

  5. MySQL
  6. MySQL is a powerful database management system used for organizing and retrieving data

    To install MySQL, open terminal and type in this command:

    sudo apt-get install mysql-server

  7. PHP
  8. To install PHP, open terminal and type in this command:

  9. sudo apt-get install php5 libapache

At the end of LAMP install you have to restart web server. Open terminal and type in this command:
sudo /etc/init.d/apache2 restart

And LAMP install is over! Now you can start your first project on your own web server. 🙂